PHP code analysis on Jenkins
- Processes, standards and quality
- Technologies
- Others
Static code analysis is not very popular in PHP world, because PHP is a dynamically and stringly typed language. Even though, it is worth considering for the sake of keeping up with coding standards (one PSR-2 to rule them all) and avoiding stupid mistakes (i.e. syntax errors due to PHP version mismatch). If you have a grammar-nazi in the team, you’ll appreciate letting tools do the tedious job.
In order to make the effort worthwhile it’s good to have the toolbox integrated into CI pipeline. Benefit for the team is a constant check for compliance, letting people focus on important things during code reviews (e.g. variable and method naming, architectural decisions). For business or management benefit is also clear – nice graphs showing our code is clean and tidy. Remember, management loves graphs!

Also for the development team, just a quick glance at a chart similar to the above one can give you an idea if things go in the right direction or not. As you can see until build #230 things were going pretty well (look at checkstyle for example), but then it got awry. No need to argue. Let’s just dive in to configure all of the necessary tooling and then take a look what we can get out of it (with pictures!).
This tutorial will show you how to easily integrate various Quality Assurance tools for PHP with popular Jenkins Continuous Integration server. We will learn about the following tools:
- PHP Code_Sniffer – checks code style, has got popular conventions build-in (e.g. PSR-2, Symfony2)
- PHP Mess Detector – looks for potential problems, such as possible bugs, dead code, suboptimal code, overcomplicated expressions, etc
- PHP Depend – can generate set of software metrics for code structure (see further)
- PHP Copy/Paste Detector – scans project for duplicated code
- PHPLOC – measures the size of PHP project
- PHPUnit – runs unit tests and is used as a runner for other test tools
- phpDox – documentation generator (not limited to API)
- Phing – task runner in PHP, used to invoke other tools
Prerequisite
Ubuntu LTS (12.04 or newer)
PHP + extensions (CLI, XSL) (PHP 5.3 is an absolute minimum)
Java 6+
Jenkins CI server installation
There’s plenty of installation guides for Jenkins, so let me be brief. Just add official repo, install packages, start the service and you’re good to go:
wget -q -O - http://pkg.jenkins-ci.org/debian-stable/jenkins-ci.org.key | sudo apt-key add -
echo "deb http://pkg.jenkins-ci.org/debian-stable binary/" | sudo tee /etc/apt/sources.list.d/jenkins-ci.list
sudo apt-get update
sudo apt-get install jenkins
sudo service jenkins start
After executing all of the above steps we’ve got Jenkins CI server running on 8080 port, have a look at http://localhost:8080 to check. Regarding Jenkins web interface, let’s install indispensable Green Balls plugin by going to http://localhost:8080/pluginManager/available and filtering for “green”. Because build should always be green, not blue 🙂
Using Jenkins template for PHP
Now, it’s time to use tried-and-true http://jenkins-php.org/ template. Again, let’s drop to command line in order to make things easier:
wget http://localhost:8080/jnlpJars/jenkins-cli.jar
java -jar jenkins-cli.jar -s http://localhost:8080 install-plugin checkstyle cloverphp crap4j dry htmlpublisher jdepend plot pmd violations xunit phing
java -jar jenkins-cli.jar -s http://localhost:8080 safe-restart
Above commands gave us all the plugins for reporting and integration of PHP tools. The missing piece is actually a php-template – archetype Jenkins job that we’ll clone to get us going with creating CI build jobs:
curl -L https://raw.githubusercontent.com/sebastianbergmann/php-jenkins-template/master/config.xml | \
     java -jar jenkins-cli.jar -s http://localhost:8080 create-job php-template
java -jar jenkins-cli.jar -s http://localhost:8080 reload-configuration
At this point we’ve got Jenkins installation with plugins that will consume data produced by static code analysers and tests runners. There’s also php-template project archetype that you will clone later for your own project.
PHP QA toolbox
Let’s get back to the project to integrate it with just installed Jenkins plugins. The good old http://jenkins-php.org/ template served me well for years. It is pretty well written and nicely documented, but it requires Java installed (to run Ant). We will use PHP based tools instead. If you’re starting from scratch, you can use project bootstrap on GitHub for that. We’ll use parts of that project below as well to make things easier.
The only missing part is installation of all those PHP QA tools mentioned there. PEAR is not recommended by PHPUnit any more, but there’s a new sheriff in town called Composer. It is inspired by bundler and npm and took over PHP world by storm when I was not following. Composer installation is very simple, just paste the command into terminal:
curl -sS https://getcomposer.org/installer | php
One handy feature of Composer is require-dev section of composer.json file. It lets you specify which packages are used for application development, but don’t have to be available at runtime (think of production environment). It’s similar to test scope in Maven in a way it sets dependencies required only for testing.
Managing PHPUnit and other QA tools via Composer has got the advantage that we can have different set of tools(or versions of those) per project. Let’s create composer.json file with the tools we’ve listed earlier:
{
    "require-dev": {
        "phpunit/phpunit": "^4.8",
        "phpmd/phpmd": "^2.2",
        "squizlabs/php_codesniffer": "^2.3",
        "sebastian/phpcpd": "^2.0",
        "phploc/phploc": "^2.1",
        "pdepend/pdepend": "^2.1",
        "theseer/phpdox": "^0.8.1.1",
        "symfony/browser-kit": "^2.7",
        "symfony/css-selector": "^2.7",
        "phing/phing": "^2.12";
    }
}
Installing the tools is as simple as invoking install command:
php composer.phar install
The above one will install tools in vendor dir along with other libraries. In addition, executable will be placed in ./vendor/bin/ directory, so you can call the following tools ./vendor/bin/phploc ./src/ for example. We’ll make it more convenient with task runner in the next step.
Besides installing vendor components, Composer will create composer.lock file in the project root. The file has got information on exact versions of used libraries (uses hashes to verify that!). It’s intended to ensure that all environments are consistent and have the same dependencies. You should commit all the Composer files to repository (composer.json, composer.lock, composer.phar) to be able to replicate installation of each host.
Building with Phing
In order to execute the build process we need some task runner, and Phing is a convenient option for that. If you’re familiar with Apache Ant, you’ll feel at home, since Phing was inspired by Ant. First, we need Phing targets definitions and directory for build artifacts to be processed by Jenkins later.
cd your-project-dir
wget https://raw.githubusercontent.com/adambro/php-jenkins-example/master/build.xml
echo "cache.properties" >> .gitignore
We’ve added Phing as a dependency in the previous step, but you can also install it system-wide for convenience, or just link the binary in the root of the project:
ln -s ./vendor/bin/phing phing
Phing not only performs full-blown analysis with all the tools, but it can also run the individual tool of your choice. It has a neat advantage of ironing-out the nitty-gritty differences in CLI parameters each tool takes. In short, it is as simple as:
./phing phpcpd
The targets essentially define an executable and all command line parameters to perform particular task. Look for in build.xml file.
To make setup complete we need config files for PHPUnit, phpmd and phpdox as well:
mkdir build
wget https://raw.githubusercontent.com/adambro/php-jenkins-example/master/phpunit.xml.dist
wget https://raw.githubusercontent.com/adambro/php-jenkins-example/master/build/phpmd.xml -O build/phpmd.xml
wget https://raw.githubusercontent.com/adambro/php-jenkins-example/master/build/phpdox.xml -O build/phpdox.xml
The above provides sane defaults for PHP Mess Detector (phpmd), but I recommend checking out the documentation and adjusting the available code rules to your needs or write your own.
Creating new project in Jenkins
Now, let’s jump back to Jenkins web interface at http://localhost:8080 for the grand finale. We’ll clone php-template project archetype in order to keep all the pre-configured QA reporting plugins:
- click New Item on top-left menu
- set the name of the project
- choose Copy existing Item radio button
- then type php-template in the input field
- click OK
The first step would be to tell Jenkins how to checkout the project. Go to project configuration in Jenkins web interface in Source Code Management section (see screenshot below). We’ll use the example bootstrap Github repository mentioned before as an example:

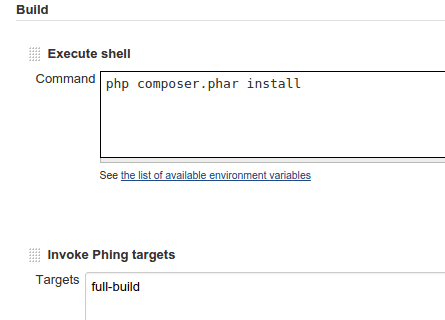
In order to configure how your code should be set up and built scroll down to Build section. There are two essential steps you have to configure:
Installing QA tools and dependencies via shell command:
- php composer.phar install
- Running code crunching tools via Phing using full-build target.
Don’t forget to uncheck Disable Build checkbox at the top, otherwise it won’t build!
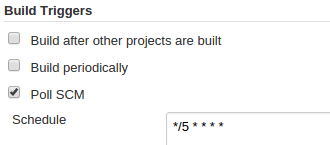
Save the configuration and we’re done. Now, you can run your just-configured Jenkins job. One remaining recommendation is to set up automatic builds. For example, every 5 minutes Jenkins can check source code repository for changes and run the job, if there were any. Just look at Poll SCM option in Build Triggers section.
The outcome
Besides project that is well-built and tested, the outcome would be nice graphs. An interpretation deserves an article on its own, so here I’ll just quickly describe what they present and what it can mean for your project.
Coupling overview
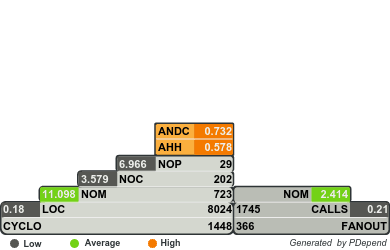
The Pyramid gives high-level visual representation of the system complexity. Provided metrics such as CYCLO (Cyclomatic Complexity), LOC (Lines Of Code), NOC (Number Of Classes), ANDC (Average Number of Derived Classes) give you an insight about the quality of the code. PDepend provides excellent explanation of those metrics for the curious ones.
In general, keeping the metrics within green or grey values would indicate that code is more manageable with small pieces to grasp (packages, classes, methods). It does not necessarily mean code quality is high or code is well-written, but rather shows that you don’t have spaghetti monsters flying in your codebase.
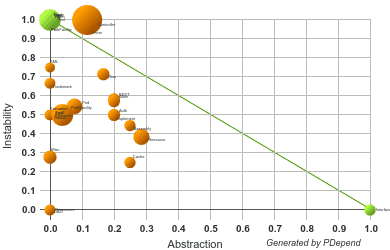
Abstraction/Instability chart shows you how much coupling is between object for each package. It helps to spot hot-spots – places in code that are often changed together (tightly-coupled) on a per-package basis. Again, the theory and practice behind coupling metrics is described in PDepend documentation.
For that chart ideal situation is if the circles stick to green line. It means they have healthy balance between abstraction and coupling. Otherwise classes can end up in Zone of Pain (bottom-left corner) or Zone of Uselessness (top-right corner). See the image at the end of the article for better illustration.
Static Code Analysis
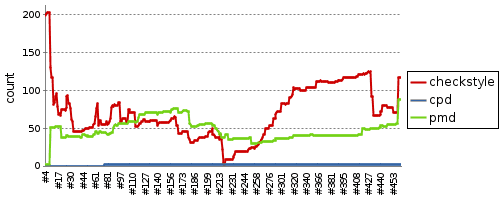
It is the essence of tracking code style during the project. It shows number of violations for:
- Check Style (phpcs) – how far you’re from set style, PSR-2 being the default
- Copy-Paste Detector (phpcpd) – how many times certain code snipped has been copied over, possibly with different variable names
- PHP Mess Detector (phpmd) – how many structural problems code has, for example Cyclomatic Complexity higher than given threshold
Tests execution trend
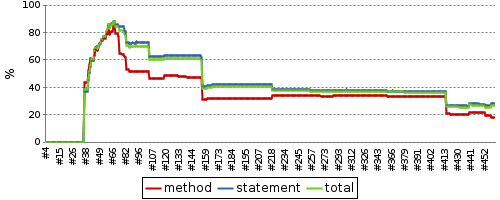
Code Coverage shows what percentage of methods (or statements) have been covered by PHPUnit tests.

Test Result Trend is pretty self-explanatory. Here, we can see that despite the fact that amount of tests have been increased, the code coverage has been getting lower. In this particular example it was due to lots of boilerplate code, which did not make sense to write tests for.
Wrapping-up
I hope I convinced you to make an effort and employ static code analysis in your toolbox. Even though QA tools in PHP world are not as developed as Java is, for example, it still gives some edge with regards to project quality. IMHO even the simple benefit of not having manual code style check during code reviews (not to mention debates of tabs vs spaces) is worth the effort.